
CenterPilot Handbook for Sponsors
This handbook covers sponsor-level functions only — for the day-to-day basics every center and site needs, see the Handbook for Centers & Sites. Last updated April 19, 2023. Prefer paper? Download the PDF.
CENTERPILOT SPONSOR HANDBOOK - DISCLAIMER
Disclaimer: Please note that enhancements to CenterPilot are made almost daily and that some of the instructions in this document may be slightly outdated. We will strive to update and post this document often at www.centerpilot.com. We ask that you check back often for updated versions.
WHAT IS NOT IN THIS HANDBOOK
The purpose of this handbook is to guide SPONSORS through functions that are SPONSOR LEVEL only. To learn the basic functions of CenterPilot that both CENTERS/SITES and SPONSORS need to know to operate effectively on a daily basis, please refer to the TRAINING HANDBOOK FOR CENTERS/SITES available online at www.centerpilot.com.
HOME:
1. Sponsor Home
The purpose of the sponsor home page is to give an “at a glance” overview of sponsored sites that have had recent activity. (Sponsors are also able to view the home pages of their sponsored sites and all other activity/pages of the sponsored sites without logging in as the site.) The following recent activities may be seen “at a glance” on the sponsor home page:
a. Facility Monthly Claims
Claims submitted by sponsored sites and the status of the claims show up here immediately after submission. Note that claims will remain in this grid until they are set to Complete status by the sponsor. The two claim statuses that will show up here include: Submitted – Claim has been submitted by the site and is “waiting” for back office processing. Sites are locked out of making further changes to the monthly meals, attendance and/or all other functions after the claim has been submitted to the sponsor. The sponsor is also “locked out” of a submitted claim until the back office performs the initial process (usually less than an hour). Note that only LIVE claims with LIVE attendance need to be submitted. Paper claims are not live and can be “entered” by the sponsor without submission. Processed - Once the back office has processed the claim, it will show as “processed” and is ready for further activity by the sponsor.
b. Facility/Sponsor Messages
Sponsors may send messages to and receive messages from their sponsored sites. Sponsors may send a message to a specific site only (perhaps to request enrollment forms on a new participant) or send global messages to all sponsored sites.
i. To send a message:
1. Click +Send Message
2. Click the drop down menu next to Recipient
3. Click the box next to the name of the site(s) to send the message, or click next to
Check All
4. When finished selecting sites, click outside the drop down menu
5. Put the curser within the Message box and type the message
6. When finished typing the message, click Send
ii. Messages sent to you from your sites will show up in the grid below. When finished with the received message, click Hide next to the message to remove it from the grid.
iii. Note that messages are not deleted when you hide them, they are archived and may be viewed at any time from Facility/Message History.
c. Participants with Enrollment Issues
This grid shows sponsored sites that have enrollment issues. Enrollment issues include new participants enrolled at the site that for which the sponsor has not yet received the enrollment information and/or participants with forms that are expired or will be expiring soon. This reminds the sponsor to contact the sites to request the required information. The numbers in this grid will adjust as sponsors receive forms and validate participants.
d. Centers Submitting New Receipts
This grid shows sponsored sites that have uploaded new/recent receipts and the details of the receipts. These entries will remain in this grid until the sponsor has processed and validated the receipt. Once approved and locked, the receipt will disappear from this grid.
2. Sponsor Information
a. Sponsor Information Tab –
Most of the information in this grid will be added when the sponsor is initially set up by CenterPilot Admin. However, the sponsor may enter any information that may be missing. Most of the cells are self-explanatory in this grid. The sponsor should be sure the following data elements are entered and correct so that facility claims are processed correctly and claim information will be uploaded correctly to the state’s claim website: Sponsor ID – This is the sponsors Contracting Entity ID that was issued by the state and Admin Cost (Percentage) – this is the amount the sponsor will charge their sites and hold out of their claims.
b. Sponsor Settings Tab –
The sponsor may make the following choices for their sponsorship which will often be determined by the state of operation:
i. Calendar Year Start Date – typically October so that the USDA contract year will take priority in reports and annual reports will reflect the USDA year.
ii. Claim Processing Type – typically Blended Rate, but should be adjusted if the sponsor’s state operates different.
iii. Use Participant Validation – typically TRUE meaning that most facilities are required to determine the eligibility status of participants. However, keep in mind that this will be overwritten when setting up facility types that do not require eligibility status determination (Head Start, At Risk After School, Summer Food Service Programs, etc.).
iv. Use Schooler Edit Check – typically TRUE meaning that most facilities with participants under the age of five will want CenterPilot to record a reason if school age children are present for a meal when school is normally in session. If this is set to TRUE, the dates of the typical school year may be entered below so that this edit check is only performed during regular school months.
v. Allow Whole Grain Error Check – typically TRUE meaning that CenterPilot will perform edit checks during certain functions to ensure that at least one whole grain is served per day.
vi. State Combination Elig/Enroll Form - If your state requires that the enrollment form and the eligibility form be separate, you would set this to FALSE so that two forms will be required in CenterPilot. Note that if your state is requiring use of the USDA Meal Benefit Income Eligibility Form, you most likely will have a separate enrollment form and would set this to FALSE. However, if your state allows or requires a combined form, you should set this to TRUE so that CenterPilot is not looking for two forms. If you have not done so already, you may submit your form(s) to CenterPilot and we will incorporate your form into the web application.
vii. Bank Information - In order to pay your sites via direct deposit, enter your banking information here.
viii. Quick Books Payment Account - Although most sponsors pay their sites via direct deposit, some sites may still be paid by checks (which are not generated by CenterPilot). Or, if your agency uses QuickBooks for accounting activities, you may enter your QuickBooks information here and export reports that may then be imported into QuickBooks. Physical checks may then be printed from QuickBooks. Additionally, QuickBooks reports may also be generated.
ix. School Year Starts/School Year Ends - If Use Schooler Edit Check (above) is set to true, enter the typical start and end dates for the school year here so that CenterPilot will not require this edit check during the summer months.
c. Sponsor Users Tab –
Sponsors may assign separate login credentials to different sponsor staff members and assign different permission levels to each. For example, the program director would need access to all information and would be set us with sponsor admin rights by CenterPilot admin initially. The program director may then choose to set up employees differently. A document posted on centerpilot.com and forwarded to new sponsors by email shows the access levels of each page for each permission level. Program directors are encouraged to consult the document and choose the permission levels for each staff member before creating the login credentials for them, although permission levels may be changed after they are initially set.
i. Sponsor permission levels include:
| Role | Basic Description |
|---|---|
| SponsorAdmin | Access to all features including claim processing functions |
| Self-SponsorAdmin | Access to all features including claim processing functions (single sites only) |
| Monitor | Access to all features except managing sponsor functions and claim processing functions |
| EnrollmentProcessor | Limited access to managing participant information |
| ReceiptProcessor | Limited access to managing receipts information |
| Trainer | Limited access to managing training manager |
ii. To add an employee login credential, click on Add New User.
1. Enter a login name for the new user
2. Enter the user’s email address
3. Select the permission level/role of the user
4. Enter and re-enter a password for the user
5. Click Save
iv. To edit an existing user, click Edit next to the user’s name. All user information other than the user name may be edited.
v. To reset a user’s password, click Edit next to the user’s name and enter and re-enter a new password, then click Save.
vi. To lock out a user (like when an employee leaves the agency), click in the box to lock out the user, then click Save.
vii. To permanently remove a user, click Edit next to the user’s name and unclick the Active box, then click Save.
3. Sponsor View of Facility Main
Sponsors may select this choice to view the home screen of any sponsored facility/site.
4. Facility Dashboard
Select this choice for a quick update of each site’s claims for the past 3 months. Also, quickly view the most recent dates meals were scheduled and attendances were taken for each site as well as the last monitor visit.
5. Manage Monitors
Add monitors and assign them to facilities/sites. Also, batch assign facilities to monitors.
a. To add a new monitor
i. Select “Add New Monitor”
ii. Enter the monitor’s first and last names and click “Insert”
b. To assign monitors to sites that do not have an assigned monitor i. Click on “select” next to the monitor’s name ii. In the grid that appears on the left, click in the box to assign the sites to the monitor iii. Click the “Assign Monitor” button at the top of the grid
c. To bulk assign all sites from one monitor to another
i. In the lower left grid, select the monitor to transfer sites from
ii. Select the monitor to transfer sites to
iii. Click on the Transfer button
d. To inactivate a monitor
To maintain an “active” monitor list, monitor names may be deleted when no longer employed. To delete a monitor, click on the red x next to their name. When a monitor is deleted from this list, any sites assigned to this monitor will return to “unassigned” status.
6. Manage Monitor Visit Questions
Sponsors may enter up to eight customized questions to print at the end of their monitor form (above and beyond the standard questions required by USDA and state agencies). Simply type each question in the spaces provided and click SAVE.
7. Active Food List
This report is available to both sponsors and facilities. It is especially beneficial for NEW sites as they are initially creating their pre-saved meals. If downloaded into Excel format and forwarded to a site, they may manipulate the document for efficiency. For example, they may choose to hide or delete the lines of foods they would never use, and they may choose to add additional columns to add the item numbers from their food vendors for more efficient ordering.
8. Current CN Label List
This report is available to both sponsors and facilities. It is a good idea to remind your sites that this list is available and encourage them to utilize it when choosing CN label food items to purchase/order. If downloaded into Excel format, they may manipulate the document for efficiency. For example, they may choose to hide or delete the lines of foods they would never use, and they may choose to add additional columns to add the item numbers from their food vendors for more efficient ordering.
9. Claim Amount to Date
This report is for the sponsor to quickly determine the amount of the claim for the month so far for each site and also totals all sites for the month. Only sites with claims for the current month will show up here.
10. Claim Amount to Date by Elig Prct
This report is for the sponsor to quickly determine the amount of the claim for the month so far for each site by eligibility percentages. All sites will show up here even if there is no claim for the current month.
FACILITY:
Most information on facilities can be accessed here.
1. Facility Information
Basic Information on all sponsored facilities is found in this section.
a. Setting Up New Facilities
i. Initial Adding of Facilities –
1. The sponsor (logged in as the sponsor); or
2. Imported by CenterPilot Admin from an Excel file (or entered from a PDF).
a. Convenient for sponsors/sites transitioning from another sponsor if the software allows exporting to an Excel or PDF file. This option is available for any sponsor or site that can forward participant information in an Excel document.
b. This function is included in the sponsor set up fee and is useful the first month the sponsor or site is active in CenterPilot.
c. Please contact CenterPilot to determine if this function is right for your sponsorship.
ii. To add a new facility –
1. Tab - Facility Information from the menu ribbon at the top.
2. Without selecting a facility, begin adding the facility information in the grid to the right.
a. Center Name
b. Facility License Number (if appropriate) c. Facility Business Phone Number
d. Facility Address, City, State, Zip Code
e. Meal Attendance Sort (alpha by last name; by classroom or by age group) i. Note that the facility may edit this information
f. Cell Phone Number of contact person
g. Facility Type (be SURE to select the correct choice):
i. Center (traditional child care center) ii. Proprietary Title XX
iii. Outside School Hours
iv. Head Start (or Early Head Start) v. At Risk After School (may include participants through age 18)
vi. Emergency Shelter (may include participants through age 18) vii. Adult Center (ages 60 and over and special needs adults 18 and over)
viii. Summer Food Service Program (may include participants through age 18) h. Training Date – for sponsor use for date of pre-approval training
i. Profit Status – For Profit or Non-Profit
j. Center or Shelter (only shelter if Emergency Shelter) k. Capacity – the licensed capacity of the center (if appropriate)
l. Email – email address of contact person at facility
m. Contact Name – name of person at facility that sponsor will contact
n. Date of License (if appropriate) o. Expiration Date of License (if appropriate)
p. Authorized Signatures – enter names of facility staff who are approved to certify the validity of the monthly claims
q. Claim Payment Information – the banking information needed to pay the facility by ACH payment
3. Tab - # Attending Meals – Enter the number of participants who are expected to attend each meal type by age group
4. Tab – Meals Served - Meals the facility will serve by type and times
a. Enter the start and end times for each meal the facility is approved to serve.
b. For facilities with two meal service times, enter the second start and end times as needed.
c. Note that facilities with two meal service times will allow two times the capacity for these meals before the over-capacity flag is triggered when processing the monthly claim.
5. Tab – Operating Schedule - Days and times the facility will be open for business
6. Tab – Sponsor Info – no action required, this information will populate automatically
7. Tab – Office Use Only
a. Has Default Meal Attending - Be sure this box is checked for all sites that use Meal Production Records so that CenterPilot will perform kitchen math.
b. Requires Participant Validation – Be sure this box is checked for site types that require eligibility determination of participants including traditional child care centers and adult centers. Leave this box blank for sites where participants are automatically eligible for “free” status including At Risk After School, Summer Food Service Sites and Emergency Shelters. Participants enrolled in these type sites will not be sent to validation and will automatically be categorized as “free”. Note, sites that have enrollment forms that expire (even if eligibility status does not expire) such as Head Start and Early Head Start facilities SHOULD be sent to validation so that enrollment expirations will be tracked. Adult centers should also be sent to validation since eligibility expires even though enrollment does not expire.
c. Facility Requires Age Blocks – Be sure this box is checked for sites that are only licensed for children under 13 years old including traditional child care centers and Head Start/Early Head Start facilities. Leave blank for sites that allow children over age 12 such as Adult Centers, At Risk After School and Summer Food Service Sites.
d. Fee Percentage – Enter the percentage of claims that will be withheld from each site for administrative fees.
e. Original Contract Date – This is not a required field, but is the date that the facility originally signed a contract with the sponsor.
f. Current Contract Date - This is not a required field, but is the current date that the facility’s contract with the sponsor (if resigned annually or other).
g. Contract Expiration Date - This is not a required field, but is the date that the facility contract with the sponsor will expire if the facility is required to resign an annual (or other) contract.
h. Assigned Monitor – Assign or change monitors for this facility here. Note, sites may be bulk assigned to monitors using the Manage Monitor function at Home/Manage Monitors.
i. State Center ID – This information is required if claim information will be exported to upload to the state claims site.
j. Facility is Active – Be SURE to check this box so that the facility will show up in your facility list. After saving, recheck to be sure this box is still checked. For sites that are no longer active, uncheck this box so the site will be moved to inactive status.
k. Note – Add any notes specific to this facility here.
l. Review Averaging – If the sponsor utilizes the review averaging option, enter the number of visits per year this site will have.
m. Corrective Action – Add notes pertaining to any corrective action plans/activities assigned to this facility.
i. Claim Alert – check this box if you wish to be alerted before processing a claim for a site that is on corrective action.
ii. Resolved – check this box if the corrective action for this site is complete and has been resolved.
iii. Date Corrective Action Implemented – enter the date the corrective action begins.
iv. Date Corrective Action Completed - enter the date the corrective action ends.
n. Save Facility Setting – Be sure to SAVE after making changes to this screen.
o. Create New User – If this is a NEW site, please skip this until the new facility is set up. Then return here and set up at least the initial user for the new site (typically the director or owner).
p. Facility Notes – This section may be used to enter multiple notes with varying dates for the same facility.
q. Bank Info – Sponsors should enter the banking information for the site here in order to process ACH or other payments.
b. Managing Facility Users
Sponsors may assign separate login credentials to different center level staff members and assign different permission levels to each. For example, the center director would need access to all information. The center director may then request to have employees set up differently. A document posted on centerpilot.com and forwarded to new sponsors by email shows the access levels of each page for each permission level. Program directors are encouraged to consult the document and give advice to the sites regarding the permission levels for each staff member before creating the login credentials for them, although permission levels may be changed after they are initially set. To add users and user permission levels for sites, the Center/Site permission levels include:
| Role | Basic Description |
|---|---|
| CenterAdmin | Access to all features including claim records |
| CenterLimited | Access to all features except the Receipts function |
| AssistDirector | Access to all features except claim records |
| Cook | Limited access to menus, meal reports and attendance module |
| Teacher | Limited access to participant information and attendance module |
| Vendor | Limited access to menus and meal reports |
i. To add a new user to a facility:
1. Select Admin/Manage Facility Users from the menu ribbon at the top.
2. Click on Add New User from the 2nd menu ribbon from the top
3. Enter the name of the user or the user role name
4. Enter the email address of the user
5. Select the facility from the drop down menu
6. Select the permission level from the drop down menu
7. Enter and confirm the user password
8. Click Insert
ii. To edit an existing user:
1. Click Edit next to the user’s name
2. All user information other than the user name may be edited
iii. To reset a user’s password:
1. Click Edit next to the user’s name
2. Enter and re-enter a new password
3. Click Save User
iv. To lock out a user:
1. Click in the box to lock out the user
2. Click Save User
v. To inactive a user:
1. Click Edit next to the user’s name
2. Unclick the Active box
3. Click Save User
2. Manage Classrooms
Please consult the CenterPilot Handbook for Centers and Sites for information regarding Manage Classrooms.
3. Message History
Please consult the CenterPilot Handbook for Centers and Sites for information regarding Message History.
4. Reports
Please consult the CenterPilot Handbook for Centers and Sites for information regarding Facility Reports.
PARTICIPANTS:
1. Participant Information
a. Initial Participant Upload
i. The initial entry of transferring participants may be entered into CenterPilot by:
1. The center/site (logged in as the center/site);
2. The sponsor (logged in as the sponsor); or
3. Imported by CenterPilot Admin from an Excel file
a. Convenient for sponsors/sites transitioning from another sponsor if the software allows exporting to an Excel file.
b. This function is included in the sponsor set up fee and is useful the first month the sponsor or site is active in CenterPilot. As new participants are added after transitioning, they should be entered by the center/site or sponsor (#1 or #2 above).
c. Please contact CenterPilot to determine if this function is right for your sponsorship.
b. Adding Participants by hand
Please consult the CenterPilot Handbook for Centers and Sites for information regarding Adding Participants by hand.
2. Participant Validation
Once entered into CenterPilot, the sponsor must validate that the participant is properly enrolled either via electronic form/signature or paper form/signature; that the correct paperwork has been received; and the correct eligibility status of the participant (free, reduced or paid). Note that the facility TYPE determines whether or not participants need to be validated. The following grid shows the requirements for all facility types. See the section on Enrolling Facilities to determine how to set up each facility type so that participants will be sent to validation if and when required. Newly enrolled participants in facility types that require validation are automatically sent to validation upon enrollment in CenterPilot. Participants with expired enrollment or validation forms will also automatically be sent to validation. Each participant must be validated in order for the participant to be correctly counted in the monthly claim. For participants requiring validation by household size and income, be aware that CenterPilot has the current eligibility rates embedded in the application and the correct assessment will be made automatically. Sponsors are not required to do the eligibility math.
a. Validate Participants as F/R/P by Household Size and Income i. From the ribbon menu at the top, select Participants/Participant Validation ii. From the drop down list, choose the facility with participants to validate iii. Participants requiring validation for the selected facility are listed in the Participants Requiring Validation grid in the upper left iv. Click the pencil next to the name of the participant requiring validation v. The information on the participant will appear in the Participant Information grid below vi. Notice that the Eligibility Type will default to PAID vii. Be sure to do the following in this order:
1. Look or scroll slightly to the right to work in the Income on Household Members grid
2. Notice that the participant automatically shows up as a member of the household
3. In the Add a Household Member grid above, begin entering the names of the other household members one by one, adding the income as appropriate
a. Enter the full name of the first household member
b. If this member has income, enter the amount of income in the Income 1 cell
c. In the drop down menu next to Income 1, choose the Income Period, or frequency of pay. Choices are:
i. Weekly
ii. Bi-weekly
iii. Monthly
iv. Bi-monthly
v. Annual
| Facility Type | Enroll Form Required | Eligibility Form Required | Enrollment Expires | Eligibility Expires | Auto Free | Paid Status on Expire | Validation Needed on Expire |
|---|---|---|---|---|---|---|---|
| Traditional Center | Yes | Yes | Yes | Yes | No | Yes | Yes |
| Adult Center | Yes | Yes | No | Yes | No | Yes | Yes |
| Head Start Center | Yes | No | Yes | No | Yes | No | Yes |
| At Risk After Sch | No | No | No | No | Yes | No | No |
| Emergency Shelter | No | No | No | No | Yes | No | No |
| Summer Food Serv | No | No | No | No | Yes | No | No |
d. If this member has additional income, enter it in the Income 2 cell and select Income Period.
e. Continue with this member until all income sources are included.
f. If this member does not have income, check the box to indicate No Income
g. Click Save Member
i. Notice that this member is now added to the Income on Household Members grid below.
ii. Continue adding household members until all members are added.
h. When finished adding household members and income, scroll slightly back to the left and notice that the household size and income appears in the bottom right of the Participant Information grid.
i. Look above and check the following two fields:
i. Current CACFP Date - verify it is correct or make corrections (or for renewals, enter the new enrollment date, or update the year).
ii. Signature Date - verify it is correct or make corrections (or for renewals, enter the new signature date, or update the year).
1. Note that if you change the signature date, you will need to confirm the change before continuing by clicking on Confirm Delete.
j. In the middle of the grid, click these two boxes:
i. Have Enroll Form
ii. Have MBF Form
k. Scroll up and click Save Eligibility
l. Watch the Eligibility Type change from PAID to FREE or REDUCED if appropriate, or if the participant is not eligible, it will remain PAID.
m. If this participant should be counted in the previous month’s claim at the new eligibility level, click on Affect (Month) Claim above.
n. When finished with this participant, click in the box next to All Done, then Save Eligibility and the participant will leave the Validation screen.
b. Validate Participants as Free by Categorical Eligibility
i. From the ribbon menu at the top, select Participants/Participant Validation
ii. From the drop down list, choose the facility with participants to validate
iii. Participants requiring validation for the selected facility are listed in the Participants Requiring Validation grid in the upper left
iv. Click the pencil next to the name of the participant requiring validation
v. The information on the participant will appear in the Participant Information grid below
vi. Notice that the Eligibility Type will default to PAID
vii. Be sure to do the following in this order:
1. Using the drop down menu labeled as Please Select Free Type, select the correct category. Categories to choose from include:
a. At Risk – Usually only in At Risk After School sites; does not require a program number
b. Foster Care – Does not require a program number
c. SNAP # - Enter program number in space to right
d. TANF # - Enter program number in space to right
e. Title XIX – For adult care facilities only; Enter program number in space to right
2. Look to the left and check the following two fields:
a. Current CACFP Date - verify it is correct or make corrections (or for renewals, enter the new enrollment date, or update the year).
b. Signature Date - verify it is correct or make corrections (or for renewals, enter the new signature date, or update the year).
i. Note that if you change the signature date, you will need to confirm the change before continuing by clicking on Confirm Delete.
3. In the middle of the grid, click these two boxes:
i. Have Enroll Form
ii. Have MBF Form
4. Scroll up and click Save Eligibility
5. Watch the Eligibility Type change from PAID to FREE
6. If this participant should be counted in the previous month’s claim at the new eligibility level, click on Affect (Month) Claim above.
7. When finished with this participant, click in the box next to All Done, then Save Eligibility and the participant will leave the Validation screen.
c. Copy Validation Information from A Sibling
i. Since the sibling will have the same eligibility information as the original participant/sibling, be sure to choose the method used to validate the original participant/sibling (by household size and income OR by categorical eligibility).
ii. Follow the instructions for steps I through vi of either method.
iii. Near the bottom of the grid, using the drop down menu labeled as Select Participant Eligibility to Copy From, select the name of the original sibling.
iv. Verify that the correct information appears either in the household size and income grid to the right or in the categorical eligibility field in the same grid.
v. Look to the left and check the following two fields:
1. Current CACFP Date - verify it is correct or make corrections (or for renewals, enter the new enrollment date, or update the year).
2. Signature Date - verify it is correct or make corrections (or for renewals, enter the new signature date, or update the year).
a. Note that if you change the signature date, you will need to confirm the change before continuing by clicking on Confirm Delete.
vi. In the middle of the grid, click these two boxes:
1. Have Enroll Form
2. Have MBF Form
vii. Scroll up and click Save Eligibility
viii. Watch the Eligibility Type change from PAID to FREE or REDUCED if appropriate, or if the participant is not eligible, it will remain PAID.
ix. If this participant should be counted in the previous month’s claim at the new eligibility level, click on Affect (Month) Claim above.
x. When finished with this participant, click in the box next to All Done, then Save Eligibility and the participant will leave the Validation screen.
d. Send Facilities Alerts for Eligibility Issues
i. Follow the instructions for steps I through vi of either method above (validation by household size and income OR categorical eligibility).
ii. Near the bottom of the grid, using the drop down menu labeled as Eligibility Issues, click in the box(s) next to the eligibility issue(s) for which an alert will be sent.
iii. Scroll up and click Save Eligibility.
iv. Notice that a date now appears in green text in the Alert Sent column of the Participants Requiring Validation grid at the top.
v. It is best not to continue validating the participant and leave the participant in the validation screen until the eligibility issues are corrected.
vi. When the eligibility issues are corrected, complete the validation process using the instructions above.
3. Bulk Participant Drop
Please consult the CenterPilot Handbook for Centers and Sites for information regarding Bulk Participant Drop.
4. Reports
Please consult the CenterPilot Handbook for Centers and Sites for information regarding Participant Reports.
MEALS:
Please consult the CenterPilot Handbook for Centers and Sites for information regarding:
1. Creating and Editing Participant Meals
2. Meal Calendar
3. Grocery List
4. Delete Participant Meals
5. Meal Delivery Receipt
PRE-SAVED MEALS:
Please consult the CenterPilot Handbook for Centers and Sites for information regarding:
1. Creating and Editing Pre-Saved Meals
2. Creating Pre-Saved Weeks
3. Scheduling Pre-Saved Weeks
4. Migrate Pre-Saved Meals
The Migrate Pre-Saved Meals function schedules pre-saved weeks directly into the meal calendars of facilities, but does not save the meals or weeks in the database for the new sites. This function may be used for sponsors of affiliated sites that do not want the sites to have the ability to plan and schedule their own meals. Sponsors of affiliated sites may set up a free site named Test Site or Central Kitchen and use this site to plan and schedule pre-saved meals and weeks, then migrate (copy) the scheduled meal weeks out to all affiliated sites.
a. To Migrate Pre-Saved Meals
i. Create Pre-Saved Meals
1. Create a Pre-Saved Week
2. After saving the Pre-Saved Week, be sure to check the Allow To Migrate box on the Create Pre-Saved Week screen
3. Click on Pre-Saved Meals/Migrate Pre-Saved Meals
4. In the Week To Schedule grid, using the date function, choose the Monday of the week to schedule
5. From the drop down menu below, select the name of the week to schedule. (Note that if you do not see the name of the pre-saved week listed, go back to Create Pre- Saved Meals, select the week and check in the Allow To Migrate box, then return to this screen).
6. In the Facilities list on the left, check the box next to the name of the facilities that will received the copied meal week.
7. In the upper left, click Save This Week Schedule
8. When finished processing, check the Meal Calendar page for the selected facilities to confirm the meals copied.
5. Replicate Pre-Saved Meal Weeks
The Replicate Pre-Saved Meal Weeks function copies pre-saved weeks and the corresponding pre- saved menus directly into another site and saves the meals and weeks in the database for the new sites. This function may be used for sponsors who want their sites to plan their own menus, but want to help them make healthier menu choices.
a. To Replicate Pre-Saved Meals
i. Create Pre-Saved Meals
ii. Create a Pre-Saved Week
iii. Click on Pre-Saved Meals/Replicate Pre-Saved Meal Weeks
iv. In the upper left, select the source facility (this is the facility the pre-saved meals and weeks will be copied from) v. In the Week to Replicate grid, select the name of the pre-saved meal week to copy from the drop down menu
vi. On the right, select the facilities to copy the meals and weeks to
vii. In the lower left, click Copy This Week Schedule
viii. When finished processing, check the Pre-Saved Meals List and the Create Pre-Saved Meal
Week page for the selected facilities to confirm the meals and weeks copied.
6. Reports
Please consult the CenterPilot Handbook for Centers and Sites for information regarding Pre-Saved Meal Reports.
ATTENDANCE:
Please consult the CenterPilot Handbook for Centers and Sites for information regarding:
1. Take Meal Attendance
2. Integrated Head Counts
3. Summer Foods Integrated Head Counts
4. Meal Attendance Templates
CLAIM:
1. Processing Live Claims
a. Claim Status
i. When a Live Claim is submitted by a site, the sponsor will see the status of the claim in two places:
1. On the sponsor Home Screen under Facility Monthly Claims, and
2. On the Claims/Process Live Claims/Claims with Issues screen.
ii. The claim status will be one of the following:
1. Submitted – A claim has been submitted by the site and will automatically be placed in a queue to be processed by the back office. Note that sponsors are locked out of “self-processing” newly submitted claims until they have been processed by the back office. Claims are processed in the order they are received, but should be processed and ready for further review within a few hours of submission. Note that after the initial back office processing, claims may be re-processed by sponsors as needed.
2. Processed – The claim has been processed by the back office (or an additional time by the sponsor) and is ready for further review.
3. Queued – The sponsor has placed the claim back into the queue to be re-processed by the back office. Sponsors may choose to reprocess claims themselves, or may choose to place larger claims that need to be reprocessed into the queue. Placing claims in the queue to be reprocessed will not slow down further work by the sponsor (by needing to wait for the claim to complete processing to continue using computer/device).
b. Finished Claim
Once the sponsor is completely finished with the claim and sets the claim to Complete status, the claim will disappear from both of these locations, but is still accessible from the Claims/Claim History screen.
c. Claim Processing Results
To view claim processing results (claim errors, etc.), select Claim/Process Live Claims and click on View next to the claim. Wait a few seconds for the claim information to populate.
d. Understanding the Claim Information Grids
Important information for each claim will appear in the various grids on the Claims/Process Live Claims page.
i. Meal Adjustments - Any positive or negative manual adjustments to the claim will show up here. Manual adjustments may include any adjustments made on the Monitor/Monitor Visit Detail screen or here on the claims screen. Sponsors may enter positive or negative adjustments to this grid, then reprocess the claim to incorporate the adjustments into the claim.
ii. Completed Claim Results -
1. The Facility Name, Month of the Claim, and Claim Payment amount show up in this grid.
2. There are also check boxes to inform the sponsor if the claim is currently locked and if the receipts for the claim have been set to Complete status.
iii. Claim Details - The majority of information for the claim is available here:
1. Claim Percentages
a. Total (No CIL) – The total amount of the claim without the Cash-in-lieu amount (CIL). This amount is used to calculate the amount of administrative cost to be held back by the sponsor.
b. Admin Cost – The amount of the claim that will be retained by the sponsor for administrative fees. This amount is set up for each site in Facility Information.
c. CIL (Lu & Su) – The amount of Cash-in-lieu that is added back into the amount due to the facility that is calculated on the total number of allowed lunches and suppers in the claim.
d. Free Prct – The ratio of the claim that is paid based on the number of Free participants enrolled for the month.
e. Reduced Prct - The ratio of the claim that is paid based on the number of Reduced participants enrolled for the month.
f. Paid Prct - The ratio of the claim that is paid based on the number of Paid participants enrolled for the month.
g. Over Capacity Passed – If this box is checked, the claim had no days where more meals were claimed than are allowed by the capacity of the facility. If this box is unchecked, the number of meals served that were over capacity for one or more meals is revealed in the Over Capacity Meals grid at the bottom of the page.
h. ADA – The Average Daily Attendance (ADA) for the claim. This is calculated by dividing the total attendance for the claim by the number of days in the claim.
iv. Overall Claim Results:
1. Claim Period – The month and year of the claim.
2. Total Enrolled – The total number of participants enrolled in the facility for the month (the percentage of Free/Reduced/Paid eligibility is based on this number, therefore it is important for your sites to deactivate or drop participants who are no longer in care PRIOR to the end of the month they leave care. If they are left active for even one day into the next month, they will count in the F/R/P ratio).
3. Total Attendance – The total attendance recorded for the monthly claim. Note that only participants who are claimed for a meal are considered “in attendance” for claim processing purposes. Therefore, Head Start facilities who use the Attendance Only function to track teachers eating in the classrooms will not be counted into the attendance numbers in the claim.
4. Total Free – The total number of Free participants enrolled for the month.
5. Total Reduced – The total number of Reduced participants enrolled for the month.
6. Total Paid – The total number of Paid participants enrolled for the month.
7. Total Capacity – The total number of participants allowed to be in the facility at any time. This information is entered in Facility Information.
8. Days In Claim – The total number of days that meals were claimed in the month.
v. Claim Issue Results:
1. Meal Type – The type of meal that the possible error affects. Meal types may include Breakfast, AM Snack, Lunch, PM Snack, Supper and Evening Snack. Only the meals that the facility is approved to serve (in Facility Information) will show up here.
2. Total Served – The total number of each meal type that was claimed by the facility.
Note that this is the raw number of meals claimed before the claim errors are considered, NOT the number of meals actually paid in the claim.
3. # POS Failures – The total number of Point of Service (POS) errors by meal type that resulted from claim processing. Note that these errors are transferred into this grid from the POS Failure grid to the right.
4. # Form Failures - The total amount of errors by meal type copied from the
Enrollment Form Failures grid below. These numbers will exactly match the numbers in the grid below. The numbers recorded here are errors that are deducted from the total meals served.
5. # Grain Failures - The total amount of errors by meal type copied from the Whole
Grain Meals Disallows grid to the right. These numbers will exactly match the numbers in the grid to the right. The numbers recorded here are errors that are deducted from the total meals served.
6. # School Age Failures - The total amount of errors by meal type copied from the
School Age Issues grid below. These numbers will exactly match the numbers in the grid below. The numbers recorded here are errors that are deducted from the total meals served.
7. # Too Many Failures - The total amount of errors by meal type copied from the
Disallowed Meals Report for the days in which too many meals were claimed for participants (more than two main meals and one snack). These numbers will exactly match the numbers in Disallowed Meals Report. The numbers recorded here are errors that are deducted from the total meals served.
8. # Multi Disallows (+ Adjustments) – Meals for participants that have more than one error will be added back in here. For example, a participant that is disallowed for form failure, school age failure and POS failure will show only one disallowed meal, not three. The other two disallowances for the same meal are added back in and reflected here.
9. # Adjustments – The number of manual adjustments from the Meal Adjustments grid above are copied here. These numbers will exactly match the numbers in the Meal Adjustments grid above. The numbers recorded here are errors that are deducted from the total meals served. Note that Meal Adjustment errors are not subtracted from POS errors. This is a signal to the sponsor that further investigation may be necessary to determine if any participant meals were already disallowed for another reason.
10. Total Accepted - The total number of each meal type that will be paid to the facility.
Note that this is NOT the raw number of meals claimed, but the number remaining after the claim errors are considered and disallowed.
vi. Enrollment Form Failures - Participants who are new but have not successfully been sent through Participant Validation for proper acceptance of enrollment documents and/or proper determination of eligibility type will show up here. Also, current participants who have had enrollment/eligibility form expirations during the current or previous months will also show up here. All participants who show up here will have all meals claimed for the month disallowed. To correct Enrollment Form Failures and pay for the participants, please return to Participants/Participant Validation, select the correct participant to edit and follow the steps to correctly determine the eligibility of the participant and remove them from validation. NOTE: TO INCLUDE THE EDITED PARTICIPANT AT THE CORRECT ELIGIBILITY RATIO FOR THE CLAIM BEING PROCESSED, BE SURE TO CLICK THE AFFECT (MONTH NAME) CLAIM AND THEN CLICK SAVE ELIGIBILITY. Once all participants have been sent through validation, return to the Process Claims screen and reprocess the claim to include them in the current claim payment.
1. Participant – The name of the participant who is being disallowed due to a form failure.
2. Eligibility Type – The eligibility type (Free, Reduced or Paid) of the participant being disallowed due to a form failure. In most cases (i.e., traditional child care setting), this will be PAID since the form failure is due to a missing form or an expired eligibility that would result in the participant defaulting to PAID status again. In the case of ARAS, SFSP, Adult Centers and Emergency Shelters, the status will remain FREE, but the participants will need to be released from validation. In the case of Head Start facilities, the participant’s status will remain Free, but they will not be included in the claim until an updated enrollment form is received and they are assessed and released from validation.
3. Expire Date – The date the participant’s enrollment/eligibility form expired (or will expire in the case of a new participant who is missing forms).
4. Has Enrollment – If this box is unchecked, it will alert the sponsor that the enrollment and/or eligibility form is either missing or expired.
5. # Meals Taken – The number of meals (by type) that were claimed (and disallowed) for this participant for the month.
vii. School Age Issues -
1. PAY – To pay for the disallowance, click PAY and reprocess the claim.
2. Participant Name – The name of the school age child who was claimed during normal school hours with or without an appropriate reason.
3. Meal Date – The date of the meal disallowance.
4. Attend Am – If this box is checked, the participant was claimed for an AM Snack during normal school hours with or without an appropriate reason.
5. Attend Lu – If this box is checked, the participant was claimed for a Lunch during normal school hours with or without an appropriate reason.
6. Attendance Reason – The reason selected by the site for the attendance of a school age child for a meal (AM Snack or Lunch) during normal school hours. (Note, in order for a list of school age “reasons” to show up for AM Snack and Lunch in the Attendance module, the school age error check must be activated in Home/Sponsor Information/Sponsor Settings. Use Schooler Error Check must be TRUE and the school year begin and end dates should be selected at the bottom of the grid. The four school age “reasons” to choose from in the Attendance module are School Holiday, Illness, Vacation and Spring Break).
viii. Over Capacity Meals: The system checks each meal claimed by the facility to determine if more than the allowed number of participants are claimed for each meal. If it is determined that more participants are claimed than is allowed by the capacity, the number of meals OVER capacity will show up here. Note that these meals are NOT automatically disallowed. The sponsor may choose to investigate further and allow or disallow these meals. For facilities that have split meal shifts approved in Facility Information, the system will allow twice the number of the capacity for those meals before determining the site to be over capacity.
1. Meal Date – The date that has more than the allowed number of participants in attendance for one or more meals.
2. Meal Type – The type of meal that has more than the allowed number of participants in attendance.
3. Capacity – The number of participants the center is allowed to have at any one time.
4. Served – The total number of meals claimed for the meal specified.
5. Capacity Results – The number of meals claimed for the meal that are above the number allowed by the facility’s capacity. This is the number the sponsor may choose to pay (by not taking any action) or disallow manually using the Meal Adjustments grid near the top of the page.
ix. POS Failures: Point of Service (POS) Failures occur when more participants are claimed in attendance at a meal than are planned for in the expected numbers (by age group) for the same meal. Please consult Appendix A for a detailed description of how POS Failures are calculated and disallowed from a monthly claim. If the site DID have enough food prepared and served for the number of participants claimed for the meal, this may be a “false” POS error. This may occur if the facility recently enrolled more participants, but failed to update the default # Attending Meals in Facility Information. Or, if there was a school holiday resulting in more participants claimed during normal school hours, but the facility failed to update the expected numbers for just that day in Meals/Create Edit Meals. When it is noted that one of these situations has occurred, and the facility DID serve enough food, the sponsor or facility should correct the POS Failure so that the meal will be paid instead of disallowed (which is the current state).
1. To correct a false POS error:
a. Visit the Meal Calendar page to determine where a POS failure has occurred (meals with POS failures will display as purple).
b. Determine if the POS failure was an actual failure.
2. If enough food was NOT served, this is an actual POS failure and should not be corrected so that the number of participants (by age group) served that are above and beyond the number of meals planned will be disallowed on the claim. Note that not ALL of the participants that were claimed for the meal will be disallowed, only the number of participants for whom not enough food was served.
3. If enough food WAS served, this is a “false” POS failure and should be corrected.
Note that if the claim has been submitted, the sponsor must return the claim to the site for corrections and resubmittal. Claims in submitted status are not editable.
a. From the Menu at the top, select Meals, then Create/Edit Participant Meals.
b. Select Infant or Non-Infant.
c. Select the Meal Type from the Meal drop down menu (Breakfast, AM Snack, Lunch, PM Snack, Supper or EV Snack).
d. Select the Meal Date.
e. Correct the Expected Attendance at the bottom for this meal type and date so that the expected number of participants is equal to or more than the number who were actually served (resulting in the correct amount of food that was actually served).
x. Whole Grain Meal Disallows:
1. CenterPilot has several edit checks in place to ensure facilities do not plan or claim a day when there is not a whole grain option served at least once for the day. Edit checks occur in the following pages:
a. Facility Main/Home Screen – The grid in the upper left has a column Day Has WG. If the circle in this column is green, a whole grain is scheduled for the day.
b. Create/Edit Meals and Create Pre-Saved Meals. Warnings appear on these pages when creating meals to remind facilities to serve a whole grain option daily. Note that all whole grain options must be scheduled from the Whole Grain drop down list so that CenterPilot recognizes the choice as a whole grain.
c. Create Pre-Saved Meal Week – Days of the week will not save if at least one meal chosen for the day does not have a whole grain option. A warning banner will appear when attempting to save the day.
d. Claims/Process Live Claims – The last resort is that CenterPilot will perform a final check during claims processing to determine if any days made it through the other edit checks without having a whole option. Note that this may occur if a site edits a meal that was previously scheduled and passed the edit checks because a whole grain was originally scheduled for each day. For example, the site schedules a Pre-Saved Week that has whole grain options scheduled every day, then edits one or more meals in that day and “accidently” edits out the whole grain options.
i. If a whole grain error is identified during the claims processing function, the day that is missing a whole will appear in the Whole Grain Meal Disallows on the bottom right of the claims processing screen.
ii. CenterPilot will disallow the meal or snack that will deduct the least amount of funds from the facility after assessing which meals have grains and/or whole grains scheduled.
iii. The first column gives the sponsor the option to pay for the whole grain disallowances.
iv. The second column of the grid reveals the meal type that was disallowed and the number of meals disallowed.
v. The remaining columns show the pattern for the day:
1. A green dot in any of the next 6 columns indicates that a meal was scheduled for that meal type (BK, AM, LU, PM, SU, EV) for the day.
2. A red dot in the same columns indicates that a meal was not scheduled for that meal type (BK, AM, LU, PM, SU, EV) for the day.
3. A green dot in the columns BK G; AM G; LU G; PM G; SU G; or EV G indicates that a grain was included in the scheduled menu for this meal type (BK, AM, LU, PM, SU, EV). Also, a green dot in the BK M column indicates a meat was served in place of a grain at breakfast this day.
4. A red dot in the columns BK G; AM G; LU G; PM G; SU G; or EV G indicates that a grain was not included in the scheduled menu for this meal type (BK, AM, LU, PM, SU, EV). Also, a red dot in the BK M column indicates a meat was not served in place of a grain at breakfast this day.
5. A green dot in the columns BK WG; AM WG; L WG; PM WG; SU WG; or EV WG indicates that a whole grain was included in the scheduled menu for this meal type (BK, AM, LU, PM, SU, EV).
6. A red dot in the columns BK WG; AM WG; L WG; PM WG; SU WG; or EV WG indicates that a whole grain was not included in the scheduled menu for this meal type (BK, AM, LU, PM, SU, EV).
2. Processing Non-Live Claims (Create Meal Count Claim)
Sites that do not take “live” attendance (by participant name using the Take Attendance function) will not produce a “Live Claim.” However, a Non-Live Claim may still be created allowing the sponsor to include these sites in the claim to state and in all claim reports. This function is ideal for sites such as summer feeding sites that are not required to enroll children or take meal counts/attendance by name, but take head counts at the time of meal service. This function is also useful for any sites that are still sending in manual claims. Sponsors may enter the head counts for each day into CenterPilot by using the simplified head count function.
a. Integrated Head Counts
Please reference the CenterPilot Handbook for Centers/Sites for information on taking Integrated Head Counts and Summer Foods Integrated Head Counts.
b. Summer Foods Integrated Head Counts
Please reference the CenterPilot Handbook for Centers/Sites for information on taking Integrated Head Counts and Summer Foods Integrated Head Counts.
c. To Create/Process a Manual Head Count Claim
i. Select Claim/Create Meal Count Claim.
ii. Select the facility.
iii. Select the month and year of the claim.
iv. Confirm that all information is correct.
v. Click Process Claim.
vi. Confirm that claim is correct.
vii. Click Lock Claim.
viii. The manual claim will now appear in the State Upload file.
d. To Create/Process a Summer Head Count Claim
i. Select Claim/Create Summer Foods Claim.
ii. Select the facility.
iii. Select the month and year of the claim.
iv. Confirm that all information is correct.
v. Click Process Claim.
vi. Confirm that claim is correct.
vii. Click Lock Claim.
viii. The manual claim will now appear in the State Upload file.
3. Assigning Claims to Batches
Note that unless you plan to pay claims at separate times, there is no reason to use the Batch function. CenterPilot marks all claims as FILED once they are uploaded to the state, and then PAID once they are sent through the ACH function and then clears them from those screens. All unfiled and/or unpaid claims will show up automatically in both screens (State Upload File and ACH File) without a batch assigned.
a. Select Claims/Process Live Claims
b. Click on View of the claim you wish to assign to a batch.
c. Select a Batch Group.
d. Click in the box to Set Claim to Complete.
e. The claim will disappear from this screen.
f. In the State Upload screen, the claim will show up only after selecting the correct Batch number.
4. Setting Claims to Complete
Claims must be set to complete for any other action to occur and for the claim information to be pulled into any claim reports.
a. Select Claims/Process Live Claims.
b. Click on View of the claim you wish to set to complete.
c. Click in the box to Set Claim to Complete.
d. The claim will disappear from this screen.
e. The claim may now be viewed/accessed in the Claim History.
5. Processing Claim Amendments
Amending Paid Claims – Only claims in PAID status can be amended using the Amend Claim function. Claims that were previously paid, but need to be amended after the payment is complete should NOT be re-processed, but rather should be amended. This allows the “new” UNPAID portion to be paid without repaying the entire claim (including the previously paid portion).
a. Select Claim/Claim History.
b. Select the Facility.
c. Select the claim month and year (or a range of months).
d. Click on the View icon next to the claim that needs to be amended.
e. Click on the dropdown arrow above the list of claims and select Amend a Paid Claim.
f. Return to the Process Live Claims screen to VIEW and AMEND the claim.
g. Use the MEAL ADJUSTMENTS grid to add meals to (or disallow meals from) the claim. Click on SAVE in the same grid after each entry.
h. When finished adding adjustments, either click the Place In Queue To Process (if a large claim) or click Process This Claim Now (if small claim). When the claim is re-processed, click in the box to Set Claim to Complete.
i. When you return to the Claim History page, that claim is now in COMPLETED STATUS and ready to be filed with state.
j. Select Claim/State Upload File, and select the claim period in the upper left.
k. Click in the box to Accept the claim, and create an upload file. Notice that the ENTIRE claim amount will show up here (including both the original payment and the adjusted payment since the state only needs the total amount of the claim. Note that if you will be manually adjusting this claim on your state’s claim payment site, you may skip this step, and instead click on Mark Selected As Filed).
l. Click on Mark Selected As Filed.
m. Select Claim/ACH File.
n. Click in the box to Accept the claim. Click on Create ACH File to pay the claim. Notice that only the adjusted amount shows up to be paid, not the total amount.
o. NOTE, if you wish to wait until the next claim for this site is paid, leave the adjustment in the ACH screen. When the next claim is ready to pay, select BOTH the adjustment and the current claim and process them together. The amount paid to the site will be adjusted to include both amounts.
p. NOTE, if the adjustment is a DOWNWARD adjustment, leave the claim here in the ACH screen.
When the next claim is ready to pay, select BOTH the adjustment and the current claim and process them together. The amount paid to the site will be downward adjusted to recoup the “negative” funds.
6. Claim History and Manual Claim History
Claims will not appear in the Claim History page/grid until they are set to Completed status. To set a claim to Complete, see #4 above. The Claim History screen allows sponsors and site directors to view the following on all past claims:
a. The status of the claim:
i. Completed – claim is finished and is waiting on the State Upload screen to be filed.
ii. Filed – claim is finished and filed and is waiting on the ACH screen to be paid.
iii. Paid – claim is finished, filed and paid. No further action is required.
b. The details of the claim – click the View icon next to the claim to view the following details:
i. Claim Information
1. Facility Name
2. Claim Period
3. Claim Status
4. Date the claim is submitted to the sponsor
5. The name of the person certifying the claim
6. Claim amount
7. Total of enrolled participants that are Free, Reduced and Paid during the claim month
8. Total number of enrolled participants
9. Total capacity
10. The amount of the Cash-in-lieu
11. The amount of the Admin fee paid to the sponsor
7. Creating ACH Payment File
a. Enter Sponsor/Agency Banking Information.
i. Be sure your sponsor/agency banking information is entered into CenterPilot.
ii. Home/Sponsor Information/Sponsor Settings Tab
iii. Once entered, the banking information will be saved permanently here and will not need to be re-entered monthly.
b. Enter Center/Site Banking Information.
i. Be sure the banking information is entered into CenterPilot for all of your sites, especially any new sites.
ii. Facility/Facility Information
iii. Select Facility
iv. Be sure the Direct Deposit choice is chosen in Claim Payment Information.
v. Be sure the Banking Information is entered below.
c. Create ACH Payment File
i. Be sure claims to be paid are in Completed status.
ii. Select Claims/ACH File
iii. All unpaid claims for any months will appear here.
iv. Select All or Accept each claim that should be paid.
v. Click on Create ACH File. Note that it may take a few seconds to download. If you open this file and it is empty, create the file again and wait a few seconds before opening.
vi. Open this file and/or save it to desktop or elsewhere. You may choose to name it something like January 2020 Center Claim Payments.
vii. Note that if you have sites that are both traditional centers and ARAS at the same location
(and share the same state ID), you will only see one entry in the ACH file for that site, but the information for both programs will be included in that entry.
viii. Login to your bank’s website and upload the saved file according to your bank’s website directions.
ix. Return to the ACH File screen.
x. Click on Mark Selected as Paid to mark the claims as paid.
xi. The claims will disappear from this screen.
xii. The claims will show PAID status in Claim History.
xiii. Note that CenterPilot pays all claims via the ACH function only. To run manual checks using
Quick Books, see Create Quick Books Export File below.
xiv. Once claims are removed from the ACH File screen, they can be sent there again.
1. Select Claim/Claim History.
2. Select the Facility.
3. Select the claim month and year (or a range of months).
4. Click on the View icon next to the claim that needs to be sent to the ACH File screen.
5. Click on the dropdown arrow to Select to Reprocess File.
6. Select Allow ACH File.
7. Return to the ACH File screen to view the claim.
8.
Creating State Upload File
a. Once all of the claims you want to upload are processed, set the claims to Completed status.
i. View them in Claims Process page.
ii. Click in the Set Claim to Complete box.
iii. The claims will disappear from the Process Claims screen.
b. Upload the Claims to Your State’s Claim Website:
i. Select Claims/State Upload file.
ii. If no batch is assigned, you should see the claims to be uploaded listed to the right.
iii. To upload only a specific batch, select the correct Batch and only the claims in that specific batch will be listed to the right.
iv. Select All or Accept each claim that should be uploaded to the state website.
v. Click on Create state file. Note that it may take a few seconds to download. If you open this file and it is empty, create the file again and wait a few seconds before opening.
vi. Open this file and/or save it to desktop or elsewhere. You may choose to name it something like January 2020 Center Claim.
vii. Note that if you have sites that are both traditional centers and ARAS at the same location
(and share the same state ID), you will only see one entry in the state upload file for that site, but the information for both programs will be included in that entry.
viii. Login to your state’s website and upload the saved file according to your state’s website directions.
ix. Return to the State Upload screen
x. Click on Mark Selected as Filed to mark the claims as filed with your state.
xi. Click on Finish to remove them from this screen.
xii. Claims will show FILED status in Claim History.
xiii. The claims will now appear in the ACH file to be paid.
xiv. Once claims are removed from the Claim Upload screen, they can be sent there again.
1. Select Claim/Claim History
2. Select the Facility.
3. Select the claim month and year (or a range of months).
4. Click on the View icon next to the claim that needs to be sent to State Upload screen.
5. Click on the dropdown arrow to Select to Reprocess File.
6. Select Allow State Upload File.
7. Return to the State Upload screen to view the claim.
9.
Exporting Claim Information for QuickBooks
g. Enter Sponsor/Agency QuickBooks Information.
vi. Be sure your sponsor/agency banking information is entered into CenterPilot.
vii. Home/Sponsor Information/Sponsor Settings Tab
viii. Once entered, the QuickBooks information will be saved permanently here and will not need to be re-entered monthly.
ix. However, if using QuickBooks to run manual checks, the check number should be updated monthly.
h. Be sure claims to be paid are in Completed status.
i. Select Claims/QB Export File.
j. Select the month and year of the claims to export.
k. All completed claims for the month will appear here.
l. Select All or Accept each claim that should be exported.
m. Click on Create QB Export File. Note that it may take a few seconds to download. If you open this file and it is empty, create the file again and wait a few seconds before opening.
n. Open this file and/or save it to desktop or elsewhere. You may choose to name it something like January 2020 Center Claim Payments.
o. Login to QuickBooks and upload the saved file according to the directions.
p. Note that if this file will not download, you may need to perform two additional functions:
x. Although IIS is included in every installation of Windows 10, it’s not turned on by default. Here’s a way to install IIS on Windows 10.
1. Right-click on the Windows button on the bottom-left corner and select Run.
2. In the Run dialog box, type appwiz.cpl and press ENTER or OK.
3. As soon as a new window called Programs and Features is opened, click on the link to Turn Windows features on or off.
4. Click on the Internet Information Services checkbox. By default, it will install all you need to host a website.
5. Once done, click OK and Close when it says “Windows completed the requested changes.”
6. In order for the IIS file to open, you may need to download a free version of
Notepad++ from: https://notepad-plus-plus.org/downloads/
10.
Claim Reports
CenterPilot generates many claim reports once claims are set to Completed status. A complete listing of claim reports includes:
q. Monthly Claim Meal Count – Viewable by center/site showing meal counts by participant for claim month.
r. Annual Claim Summary – Viewable by center/site and may be generated for a fiscal year for tax reports.
s. Monthly Claim to Pay Via Excel – Generates an Excel file for payment options other than ACH.
t. Monthly Live Claim Summary – Viewable by center/site and may be used by sponsor for manually entering claim information into state’s claim website.
u. Monthly Live Claim Summary by Month – Same as above, but only pulls information for a single month, useful for sponsors to manually enter claim information into state’s claim website.
v. Monthly Non-Live Claim Summary - Same as above for non-live claims.
w. Monthly Claim Result Summary - Viewable by center/site and includes all claim count results.
x. Disallowance Search Report - Viewable by center/site and may be used to search claim for specific disallowances by type and occurrence.
y. Monthly Integrated Meal Head Count Report – Viewable by center/site, generates daily meal count totals for non-live claims.
z. Eligibilities Used in Claim – Shows eligibility status of all participants in a center for the claim month.
aa. Eligibility Percentages In Claim – Same as above but also calculates the eligibility percentages for the claim month.
bb. Disallows by Age Group – Shows claim disallowances by age group to assist sponsor with technical assistance to sites.
cc. Meals Taken With Dropped Status - Shows names of participants who were claimed for meals while after they were dropped to assist sponsor with technical assistance to sites.
dd. Live Claim Date History – Shows all dates related to the claim including date submitted to state and paid to sites.
ee. Non-Live Claim Date History – Same as above for non-live claims. ff. Live Claim Reimbursement Rates – Shows reimbursement rates for each meal by claim month for sites. The sites may also view this information in Facility Information/Meals Served.
gg. Claim Receipts
xi. Live Claim Payment Receipts – Report is viewable by center/site and gives detailed description of the claim month for live claims including
1. Amount of Claim and Payment to Site
2. Amount of CIL and Admin
3. Accepted Meal Totals
4. Disallowance Results
xii. Non-Live Claim Payment Receipts – Same as above for non-live claims.
RECEIPT:
1. Entering Receipts
Please consult the CenterPilot Handbook for Centers and Sites for information regarding Receipt Entry.
2. Processing and Locking Receipts
Sponsors have the ability to process/approve the receipts entered by the facilities and lock the site out from making changes to the receipts once approved. Sponsors may also mark all receipts for a claim month as Complete and lock out the site from entering anymore receipts to the claim month.
a. To process and lock a receipt
i. Select Receipt/Receipt Process
ii. In upper left, select the facility from the drop down menu.
iii. In upper left, select the claim month
iv. Scroll down to the Receipts for This Claim grid
v. There are two ways to mark a receipt as Processed:
vi. Without selecting or editing the receipt, click in the Process box to the far right.
vii. Click on the pencil to bring the receipt into the Enter a Receipt grid and click in the Completed box and then click Save Receipt.
viii. The facility is now locked out of making changes to this receipt and the receipt entry screen is grayed out when logged in as the site. The process box also shows on the center side as checked.
ix. At this point, the site may continue entering new receipts until the sponsor locks the receipts for the claim month.
b. To unlock a receipt
i. Select Receipt/Receipt Process
ii. In upper left, select the facility from the drop down menu.
iii. In upper left, select the claim month
iv. Scroll down to the Receipts for This Claim grid
v. Uncheck the Process box next to the receipt to unlock
vi. Click on the pencil to bring the receipt into the Receipt Entry box
vii. Uncheck the Completed box and then click Save Receipt.
viii. The facility is now able to make changes to this receipt and the receipt entry screen is no longer grayed out when logged in as the site. The process box also shows on the center side as unchecked.
c. To lock all receipts for a claim month
i. Select Receipt/Receipt Process
ii. In upper left, select the facility from the drop down menu.
iii. In upper left, select the claim month
iv. Be sure all receipts are set to Complete/Processed status
v. In upper left, click in the Lock Claim Receipts box
vi. The site is now locked out from adding any new receipts for the month.
d. Non-Profit Reports
i. Two reports associated with the Receipts function include: Non-Profit Live Claim Report and Non-Profit Summary Report. These two reports may be used by the sponsor to ensure:
1. Centers/sites are not making a profit with CACFP funds, and
2. Centers/sites are spending an appropriate percentage of their CACFP funds on food.
ii. In order for these reports to work properly, sites must have receipts entered for the claim month.
iii. These reports compare the amount of the funds reimbursed to the centers/sites with the allowable expenses reported by the site (and validated with receipts) using CACFP funds.
MEAL REPORTS
1.
Milk Bank
a. Daily Milk Balances
i. From the menu at the top:
1. Select Meal Reports.
2. Select Milk Bank.
3. In the upper left, select the Month and Year.
4. Review the data that appears on the screen.
a. Planned refers to the amount of milk needed for the number of expected participants by age.
b. Served refers to the amount of milk actually served to the number of children in attendance. This number is linked directly to the attendance function.
c. Receipt refers to the amount of milk purchased. This number is linked directly to the Enter Receipt function summarized above.
d. Balance of milk (by type) is a running calculation of the amount of milk remaining in the facility after each meal is served.
5. Note: To create a Carry Over amount for each month (should be done after the last meal on the last day of the month):
a. Choose the previous month in the upper left corner.
b. In the Milk Served for the Period grid, click on Process Milk.
c. The milk balances from the last day of this month will transfer to the first entry in the same section of the current month.
d. Note that at least one receipt with milk purchases must be entered for the current month in order to carry over milk balances to the next month.
b. Using the Milk Bank for Center/Site Compliance
i. Sponsors who want to be sure centers are buying and serving enough milk may use the milk bank for this purpose.
1. The milk bank will track all purchased and served milk and keep a balance from meal to meal.
2. Milk purchases from entered receipts will be added into the milk balances.
3. A check mark in the box on the left hand side of the milk bank grid indicates that the center did not have enough milk for the meal.
a. Sponsors should investigate these instances to determine if the center is missing a receipt or failed to add milk purchases to an entered receipt. In these circumstances, the sponsor or site may correct the oversight and the milk bank will recalculate the milk balances.
b. However, if the center/site cannot produce proof of a milk purchase, the sponsor may choose to disallow the meals for which there was not enough milk.
i. Milk disallowances should be entered manually by the sponsor on the Process Live Claims screen, or the Create Meal Count Claim screen (if the claim is a manual/non-live claim).
ii. After entering manual disallowances, sponsors should reprocess the claims (or place them in the queue to reprocess) to recalculate the claim amounts.
2. Other Meal Reports
Please consult the CenterPilot Handbook for Centers and Sites for information regarding the following Meal Reports viewable on the center level:
a. Monthly Food Inventory
b. Cook Detail Summary
c. Meals Taken by Participants
i. All Daily Meals Taken Summary
ii. Meal Count Totals by Date Range
iii. Meals Taken by Participant Summary
iv. Meal Creation Record
d. Milk Reports
i. Scheduled Meal Milk Breakdown Report
ii. Scheduled Meal Milk Breakdown By Age Group Report
iii. Scheduled Meal Milk Breakdown Report By Meal Report
iv. Monthly Milk Bank Totals
v. Daily Milk Bank Totals
e. Meal Count Reports
i. Weekly Meal Count Report by Name
ii. Monthly Meal Count Report by Name
iii. Monthly Meal Count Report by Name (Excel) iv. Weekly Meal Count Report by Classroom
v. Monthly Meal Count Report by Classroom (Excel) vi. Daily Meal Count Report by Classroom
vii. Weekly Meal Count Report by Age Group
viii. Monthly Meal Count Report by Age Group
ix. Monthly Meal Count Report by Age (Excel)
f. Meal Production Reports
i. Child Adult Meal Production Report
ii. Infant Meal Production Report
g. Whole Grain Reports
i. Grains Served Across Meals Report
ii. Daily Meals Without Whole Grain Report
h. Meals Over Capacity Summary i.
Monthly Juice Report
TRAINING
1. Track Center/Site Training Sessions
Sponsors may track training sessions and dates and the names of staff from centers/sites who attend these trainings.
a. Enter New Training Category
i. Select Training/Training Manager.
ii. Enter the name of the category at the top in the space next to New Training Category.
iii. Click Add New Category.
b. Add a new Training Class
i. Select a facility in the upper left.
ii. Select Add Training in the Training Classes grid.
iii. In the new grid that appears, add the name of the training.
iv. Add the location of the training.
v. Enter the date of the training.
vi. Enter the duration (length) of the training.
c. Assign Center Staff to Training Sessions
i. Be sure the staff names for each facility are entered on the Facility Information screen.
ii. Select the facility in the upper left.
iii. Click on the Edit/Pencil next to the training name in the upper right grid to bring the class information into the lower right grid.
iv. Click on the Enrollees in Training Course drop down menu and select the staff members who attended/completed the training session.
v. Click on Save All Training Information.
vi. Select the next facility, and repeat until finished.
2. Training Reports
Please consult the CenterPilot Handbook for Centers and Sites for information regarding the Training Reports viewable on the center level.
EXPORT REPORTS
Please consult the CenterPilot Handbook for Centers and Sites for information regarding the Export Reports viewable on the center level.
MONITOR
1. Monitor Home
a. List of all Facility Visits Conducted to Date
i. Monitor Name
ii. Facility
iii. Meal Observed
iv. Last Review Date
v. Next Review Date
vi. # Observed
vii. # Expected
viii. Announced
ix. Comments
2. Conduct a 100% Electronic Monitor Visit
a. Create Pre-Populated Visit Document
i. On the Monitor Home screen, select the facility name in upper left.
ii. Non-Profit Food Service - CenterPilot will automatically pre-populate expenses and reimbursement amounts for centers for sponsors that must confirm during reviews that the site is operating a non-profit food service program. This information may be populated for the last 1 – 6 months. Note that for expenses to populate on the form, the expenses must be entered into CenterPilot using the receipt function. Likewise, for the reimbursement amounts to populate, live claims must be submitted and processed. Also, the monitor form associated with your state must be developed to collect this data (for example, the Texas form requires this data and collects it).
1. Select Reimbursement Start Month – Select the first month to begin the expense vs.
reimbursement comparison. This will be the furthest month from the present month (up to 6 months in the past).
2. Select Reimbursement End Month – Select the last month to compare expenses vs.
reimbursement. This will be the closest month to the present month (usually last month).
iii. Actual Visit Date - Choose the actual date that the visit will be conducted.
iv. Reconciliation Date – Choose any day in the five-day reconciliation period. CenterPilot will automatically populate the meal counts/attendances for Monday through Friday of the selected date week (regardless of the day selected and regardless of whether the site claims weekend meals).
v. Select the meal to be observed (breakfast, am snack, lunch, pm snack, supper or evening snack).
vi. Click Create Visit Doc.
vii. When the PDF icon appears, click to open it.
viii. Do not electronically complete the document in the browser. Instead, it will need to be downloaded and saved to your desktop or device. Double click the saved file on the desktop to open it. Depending on how the document will be completed, do one of the following:
1. If the document will be completed by hand, send the document to the printer. This will NOT be an electronically completed document.
2. If the document will be completed electronically on site using a laptop, save the document to the desktop of the laptop. Note that if you will be using the digital signature function, you will need to be sure your laptop has a pdf app or program that allows digital signatures. For example, Adobe Acrobat Pro will work, but it is not free. If you will be in a WiFi environment, you may be able to use an online pdf editor such as DocHub or FormSwift, but unless all review locations have access to WiFi, this may not be the best solution.
3. If the document will be completed electronically on site using a tablet or other device, you may email the document, retrieve it on the device, and save it to the app you will use to complete it. Or, an electronic monitor form may be generated directly on the mobile device and opened in a pdf program such PDF Expert. On devices such as tablets and phones, the pdf may be signed using a finger or stylus. Be sure to choose a pdf editor app that will work well, such as PDF Expert (there is a free version) or PDFReader Pro which is available for a small fee in the app store.
2. Monitor Visit Detail
Upon completion of a review, monitor visit details may be entered manually from the form into CenterPilot. Note that if a printed form was completed manually (not electronically), this step will still work, but all fields will not populate in CenterPilot. In both scenarios (hand written or electronically completed), the visit document itself will be uploaded and stored electronically with the visit details.
a. Enter Visit Details Manually
i. From the menu ribbon at the top, select Monitor/Monitor Visit Detail (second option from the drop down menu).
ii. Select the facility from the drop down menu in the upper left.
iii. In the upper right grid, Facility Information, confirm that the correct information populates for:
1. Acct Manager – The monitor who usually reviews this center.
2. Monitor Name – The person who actually performed this review (usually the same as the account manager).
3. Facility Type – how this site is set up in Facility Information.
4. Contact Name – the director or other individual at the site.
5. Facility Phone – the number of the contact at the site.
iv. In the Monitor Visit Grid below, enter the following information:
1. Visit Date – select the date of the visit.
2. Meal Observed (or No Meal) – Select the meal that was observed. If a meal was not observed, choose No Meal.
a. Note that when a meal is selected, the start and end times for the meal service will populate. This is the information on file in Facility Information. If split shifts are on file for this meal, the second meal start and end times will also populate to the right.
b. Note that the # Participants Expected will also populate. This number is imported from the default # attending for this meal in Facility Information. If there is a zero in this space, the information may be missing from Facility Information, or there is no meal scheduled for the selected day on the Meal Calendar.
3. If the visit was announced, check the box, otherwise leave it blank.
4. Enter the arrival and departure time of the monitor(s).
5. Enter the number of participants observed (added together from the information recorded on the form).
6. Record any non-compliances in one of the two boxes. Note that comments in the first box will not print on the next review form, but non-compliances entered into the second box will print on the next review form.
b. Upload Visit Details from Electronically Completed Form i. When the visit is complete and you have returned to a WiFi environment, you may choose to upload the visit details into the Monitor Visit Detail module. The monitor form itself will also be upload and be stored at the same time. Note that the following steps must be completed carefully in the correct order.
ii. Complete steps i. through iii. in the section above (Enter Visit Details Manually).
iii. Under Actions in the upper left side of the screen, select:
1. The name of the facility.
2. The type of meal observed (breakfast, am snack, lunch, pm snack, supper or evening snack).
3. The date of the visit.
4. The visit number (1 – 4).
5. DO NOT CLICK SAVE MONITOR VISIT AT THIS POINT.
iv. In the Monitor Visit grid on the right (middle of the screen near the bottom of the grid):
1. Be sure MONITOR DATA DOC is selected as the type of visit doc.
2. Click on Select.
3. Find the saved file on your desktop or elsewhere and select it to upload.
4. In the upper left, click on SAVE MONITOR VISIT.
v. When you receive a pop-up confirmation that the visit is saved, you should see the populated monitor information in the Monitor Visit Grid AND an icon above VIEW MONITOR DATA DOC indicating that the monitor form is uploaded and saved.
3. Monitor Reports
a. Scheduled Meal Calendar Snapshot
For the dates entered, this report may be printed by a monitor before a scheduled visit. The report indicates the colors on the monthly calendar in text format. The monitor may use this report to determine if records are up to date for the facility.
b. Incomplete Meal Snapshot
For the dates entered, this report may be printed by a monitor before a scheduled visit. The report records the days that a meal has been scheduled and/or meal attendances have been recorded. The monitor may use this report to determine if records are up to date for the facility.
c. Facilities Not Scheduling Meals
For the time period chosen (last 3, 7, 10 or 14 days), this report may be printed by a monitor before a scheduled visit. The report indicates which facilities have not scheduled meals and/or recorded meal attendances for the period. The monitor may use this report to determine if records are up to date for the facility.
d. Monitor Review History by Monitor
For the contract period, this report includes all sponsored facilities assigned to a specific monitor and the visit details for all visits conducted. The report may be generated for the current contract year or for previous contract years.
e. Monitor Review History by Facility
For the contract period, this report includes all sponsored facilities and the visit details for all visits conducted. The report may be generated for the current contract year or for previous contract years.
APPENDIX A: CLAIM REPORTING METHOD FOR STATES THAT REQUIRE REPORTING ONLY ENROLLED PARTICIPANTS BY F/R/P ELIGIBILITY STATUS
Many states only require sponsors/sites to report F/R/P status for the number of participants ENROLLED at each site. Texas is an example of a state that requires F/R/P status by number of enrolled participants. Therefore, the reporting method to be used by Texas sponsors or sites is described in the following scenario. Example: Site A has 75 participants enrolled for the claim month. Of the 75, 35 are Free, 18 are Reduced and 22 are Paid. These eligibility status numbers would be reported to the state for this site on the monthly claim. These eligibility status numbers will likely change month to month. The total number of meals by type would also be reported. In this example, participant and meal reporting would look like this:
| Total Enrollees | Free Enrollees | Reduced Enrollees | Paid Enrollees |
|---|---|---|---|
| 75 | 35 | 18 | 22 |
| Meal Type | Total Meals |
|---|---|
| Breakfast | 593 |
| Lunch | 514 |
| PM Snack | 882 |
There are several reports that reflect these numbers, but we recommend using any or all of these reports that include all of the information required to submit the monthly claim to your state: Monthly Live Claim Summary, Monthly Live Claim Summary by Month and Monthly Non-Live Claim Summary (for any sites that did not record live attendances for the month). All reports are accessed under Claim/Reports.
APPENDIX B: ALTERNATE REPORTING METHOD FOR STATES THAT REQUIRE REPORTING MEALS BY TYPE AND F/R/P ELIGIBILITY STATUS
Some states, like New Jersey, require the number of meals claimed (by type) to be reported by F/R/P status. Using the example above, the 75 participants may still need to be reported as 35 Free, 18 Reduced and 22 Paid (based on enrollment). However, in addition to this information, meals by type must also be reported by F/R/P eligibility. In this case, the meals reported would be broken into categories of meal type and eligibility status. In this example, meal reporting would look like this:
| Total Enrollees | Free Enrollees | Reduced Enrollees | Paid Enrollees |
|---|---|---|---|
| 75 | 35 | 18 | 22 |
| Meal Type | Total | Free | Reduced | Paid |
|---|---|---|---|---|
| Breakfast | 593 | 271 | 220 | 102 |
| Lunch | 514 | 257 | 149 | 108 |
| PM Snack | 882 | 422 | 286 | 174 |
The report to use to reflect this reporting method is the Live Claim F/R/P Actuals accessed under Claim/Reports.
Alternate Reporting Method for States That Require Reporting Meals for School Age Participants Separately (Using the Same Reporting Method Above)
New Jersey also requires the number of meals claimed (by type) for school age participants to be reported separately. To track school age meals separately, we recommend creating a separate classroom (under Facility/Manage Classrooms) and assigning all school-age participants to that classroom. Name the classroom something obvious like Schoolers. Using the example above, the 68 participants will need to be broken down even further (based on enrollment of school-age participants vs all other ages). In this example, meal reporting would look like this:
| Group | Total Enrollees | Free | Reduced | Paid |
|---|---|---|---|---|
| Total | 75 | 35 | 18 | 22 |
| Total Non-SA | 47 | 24 | 10 | 13 |
| Total SA | 28 | 11 | 8 | 9 |
| Meal Type | Total | Free | Reduced | Paid |
|---|---|---|---|---|
| Breakfast Non-SA | 340 | 178 | 129 | 33 |
| Breakfast SA | 253 | 93 | 91 | 69 |
| Lunch Non-SA | 424 | 231 | 120 | 73 |
| Lunch SA | 90 | 26 | 29 | 35 |
| PM Snack Non-SA | 480 | 263 | 170 | 47 |
| PM Snack SA | 402 | 159 | 116 | 127 |
To determine the number of schoolers, as well as the meals by type and eligibility for schoolers vs non- schoolers, we will use this report accessed under Claim/Reports/Claim MCR Reports: Claim Meal Count Report by Classroom (Excel). Generate this report for the site and month desired, then export it to Excel. To determine the number of meals by F/R/P status:
1. Look towards the bottom of the report where there are tabs and click on the last tab Grand
Total.
2. The total meals by F/R/P status are broken out for all classrooms.
3. Subtract the schooler classroom meals by type and eligibility from the totals in the Live Claim
F/R/P Actuals report referenced in the previous section of this document.
4. Note that you may wish to export the Live Claim F/R/P Actuals report to Excel and add rows to insert the schooler data below the total data for the site. You may then choose to insert formulas to subtract the schooler data from the total data to arrive at the non-schooler data.
To determine the number of schoolers by eligibility status:
1. On the first tab (Week 1), highlight and delete all rows except the rows with the data for the schooler classroom. Quickly count the total number of schoolers, then verify that all remaining tabs have the same number of schoolers (for Weeks 2 – 5).
2. Back on Week 1 tab, color code the schoolers according to their F/R/P status (column AM).
3. Sort by 1) Column B (name), and 2 by color code (F/R/P status).
4. Quickly count the number of participants in each eligibility category and subtract these numbers from the totals in the Live Claim F/R/P Actuals report.
APPENDIX C: CLAIM DISALLOWANCES
1. Kitchen Math
a. CenterPilot is programmed to perform all kitchen math calculations so cooks and sponsors do not need to. The Grocery Lists use kitchen math to ensure enough food is ordered/purchased for the PLANNED number of participants of each age group.
b. The Meal Production Records use kitchen math to ensure the cook opens enough food for the
PLANNED number of participants of each age group. If more participants are then marked in attendance for the meal than are PLANNED for, the ACTUAL number served is more than the PLANNED number, and a Point of Service (POS) error has occurred.
c. The Claim Processing function uses kitchen math to ensure that all POS errors show up as claim errors.
2. Highest Reimbursement Calculations
a. Raw Disallowances
i. CenterPilot is programmed to provide the highest possible reimbursement to facilities. With this in mind, even though “raw” disallowance numbers will show up in the Claim Issues grid for all error types, any meal or participant who has already been disallowed for another reason will be “credited” back into the payment numbers so that every participant is only disallowed once for the same meal.
b. POS Errors in Claims
First Check – Calculation of Food Amounts:
i. If a POS error shows in the POS Failures grid on the left hand side of the Claims Processing page, CenterPilot has already performed kitchen math and determined that not enough food was served for the number of ACTUAL participants served. Several calculations were performed.
ii. lf a site actually served less participants than were planned for in one age group, but more participants were actually served in another age group than were planned for (a possible POS error), CenterPilot will calculate the actual amount of food opened/served before automatically disallowing the age group that had more in actual attendance than for the number planned. For example, a facility that plans for the following scenario for a Lunch:
| Component | 1 Year Old | 2 Year Old | 3–5 Year Old | 6–12 Year Old | ||||||||
|---|---|---|---|---|---|---|---|---|---|---|---|---|
| Plan | Served | Diff | Plan | Served | Diff | Plan | Served | Diff | Plan | Served | Diff | |
| Participants | 5 | 6 | +1 | 5 | 5 | 0 | 5 | 7 | +2 | 5 | 1 | -4 |
| Milk, Whole (in pints) | 2.5 C | 3 C | -.5 C | |||||||||
| Milk, 1% (in gallons) | 2.5 C | 2.5 C | 0 | 3.75C | 5.25C | -1.5C | 5 C | 1 C | +4 C | |||
| Vegetable | .625C | .75C | -.125C | .625C | .625C | 0 | 1.25C | 1.75C | -.5C | 2.5C | .5C | +2C |
| Veg/Fruit | .625C | .75C | -.125C | .625C | .625C | 0 | 1.25C | 1.75C | -.5C | 1.25C | .25C | +1C |
| Meat/Alt | 5 OZ | 6 OZ | -1 OZ | 5 OZ | 5 OZ | 0 | 7.5 OZ | 10.5 OZ | -3 OZ | 10 OZ | 2 OZ | +8 OZ |
| Grain | 2.5 OZ | 3 OZ | -.5 OZ | 2.5 OZ | 2.5 OZ | 0 | 2.5 OZ | 3.5 OZ | -1 OZ | 5 OZ | 1 OZ | +4 OZ |
Scroll the table sideways on smaller screens.
Note that in this scenario, there is one extra 1-year-old and two extra 3-5 year olds, but only one 6-12-year-old was served (when five were planned). Because of the four “missing” 6-12 year olds, enough food is actually planned to cover the extra one-year-old and the two extra 3-5 year olds. With that in mind, there is NO POS error at all UNLESS the WHOLE MILK is selected in half pints (cups). This is because CenterPilot will round amounts of food and milk to open UP to the next HALF container. So, the six 1 year olds would require 3 cups (half pints), but the planned number of 5 half cups (half pints) will remain only 2.5 cups (or 2.5 half pints). The excess of all other components is enough to cover the actual food, but the excess 1% milk will not cover a shortage of whole milk. However, if whole milk is selected in pints or larger quantities, there is NO POS failure. This may also be the case when selecting any food components in the “single serve” size that only holds enough per container to feed one school age child (ex: fruit cups, 1 oz. cracker servings, half pint milk containers, etc.). Sites that choose single serve size components should be extra careful to check their planned numbers for each meal and might benefit from adding in a few extra planned meals for each age group.
iii. Back to our example…note that IF half pints were selected for the whole milk, there will be a POS failure in the claim, and it will appear like this:
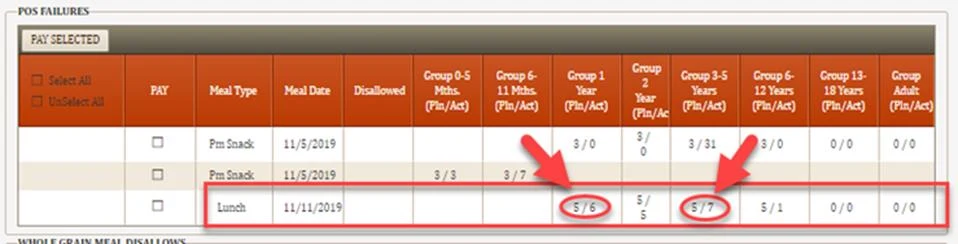
APPENDIX D: CENTER/SITE COMPLIANCE LOGS
CenterPilot allows sponsors several options for confirming compliance by sites. Here are a few options:
1. Meal Creation Record – this report tracks by dates and times when activities are performed and by which staff person.
a. Select Meal Reports/Meals Taken by Participants Reports/Meal Creation Record
b. Includes columns for dates and time for the following activities:
i. Meal Scheduled
ii. Meal Updated
iii. Attendance Taken
iv. Attendance Updated
c. Includes two columns to record which login at the site performed the activity and another column to record if the activity was updated and if so, by whom.
i. Note, see the dialog on setting up various center staff with permission levels. The more logins assigned to a center, the easier to tell who is performing which functions and when.
2.
Meal Calendar – As explained in the Center Handbook, the calendar page gives an “at a glance”
update on what functions have been performed in real time.
3. Monitor Reports – A few reports will assist monitors when printed and taken to the visit. All may be accessed here: Monitor/Monitor Reports
a. Scheduled Meal Calendar Snapshot
b. Incomplete Meal Snapshot
c. Facilities Not Scheduling Meals
i. May print a report for facilities with no scheduled meals
ii. May print a report for facilities with no attendance on scheduled meals
1. Both choices may be assessed for the past 3, 7, 10, and 14 days
4. Milk Bank
Please see section on Milk Bank.
← Back to all training · Questions? Call (214) 427-4467 — a real person answers.
Want a guided tour instead?
Schedule a free 30-minute demo and we’ll walk you through it live — your program, your questions.